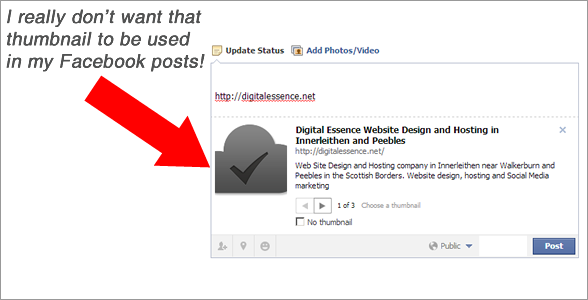
How do I Force Facebook To Use A Thumbnail From My Website?
How to force Facebook to display the image you want when sharing your website on Facebook. Part I in our mini-series
How to force Facebook to display the image you want when sharing your website on Facebook. Part I in our mini-series

Google Authorship and rel=”author” – You’ve probably heard about it right?
You’ve almost certainly seen some people’s faces show up in search results and wondered “how do they do that” and “how can I set this up for my website or blog?”
They do it by linking their Google Authorship in Google+ to their content on their website. This is called a “rich snippet” and is set to be huge in terms of Search Engine Results.
This is how it looks

Stands out doesn’t it?
And here’s the killer. Because it stands out, users are more likely to click on it.
In fact, some companies have seen a 150% increase in click through rate since implementing Google Authorship and that’s a figure you’d be daft to ignore.
Well, sit back and relax as we are going to run you through the basics of what Google Authorship is, how to link your Google+ account to your blog and how to use rel=”author”.
Google Authorship is a way to link content you create on your or others websites and blogs with your Google+ profile using a rel=”author” tag. You become the author whether you post on your site or another blog.
It allows you to extend your credibility to your content and is amazingly powerful.
1) SEO benefits of Authorship
Content is King and Google loves good quality content. Authors of good quality content who generate traffic and social buzz will develop an Author Ranking which will give a boost to all the content they write. Note Author Ranking is not the same as Google Authorship. Author Ranking is where, over time you build up a ranking as an expert in your industry who writes good quality, relevant content that people read and link to.
2) Improved engagement between you and your audience
Your company shouldn’t be a faceless corporation and customers love to deal with real people and your website or blog shouldn’t be any different.
3) Name awareness/Industry Expert
Google Authorship allows you, the person to be the author and as time goes on and as you continue to write good quality content, you may become an industry expert.
Ok… enough already, you’re sold! Why don’t we just get on and tell you how to add Google Authorship to your page….
Your first step is to create a Google+ profile. We hear lots of people saying “We don’t get Google+” or “it’s useless, there’s nobody there” but we love it. Ok it isn’t Facebook but it isn’t trying to be.
The key to Google+ is to join communities related to your interests. For example we belong to and contribute to several communities related to WordPress, Genesis Framework, PHP and Search Engine Optimisation and it is now our go source for tips, hints and answers when we are stuck.
Anyway, we digress. Let’s move on to setting up a Google+ profile.
The first step is to join Google+. If you have an existing Google account (Gmail, Google docs, Google Webmaster Tools, etc) then you already have a basic stub account you can use.
Browse to https://profiles.google.com/ login with your username and password. If you don’t have an account you can create one. If you can, make sure to use an email address on the same domain as your website or blog. It makes the whole process much easier. For example for us our website domain is digitalessence.net so we would use an email like our_name@digitalessence.net.
Don’t have an email address on the same domain? Use this link to link your content to your Google+ profile and select Option 2.
When prompted, upload a clear facial headshot for your profile. Don’t use art, cartoons etc. make sure your image is at least 250×250 pixels or it will fail the upload.

Once you are happy, click next step and then Continue to Google+. Continue to fill out your profile and add communities or people you might know and follow through the hints and tutorial as Google shows you how to use Google+
In the meantime, Google will have sent you a verification email. Make sure you click the link in this email and verify your account so that Google knows you are legitimate.
Now you have your page set up it’s time to set up your Google Authorship.
On the left hand side of the Google+ page, hover over the Home > icon under the Google+ logo and your dashboard will slide out. Select Profile.
At the top of the screen just above your default cover image (you can change this later) select About and scroll down to the links Section and click Edit

Now from the Links section, select Contributor to > Add custom link
And give your site a label and the url. For instance we added Digital Essence and the url: https://digitalessence.net/
Click Save.
You are now set up as a Contributor to that website. If you write for more than one site/blog then add the other url’s in here as well as you can be a contributor for many sites.
Before we move on, grab the 21 digit ID from your address bar. Eg:
[code]https://plus.google.com/103629750031267776626/posts[/code]
NOTE: Don’t use this ID, it is ours and will add us as a contributor to your site!

Keep this safe for now as we are going to use this in a Meta data tag on your site.
You can optionally complete all the other sections of your Google+ profile to include your location, occupation and other information. While these details aren’t required for Google Authorship, we are sure they add some credence to your reputation.
Now we move on to your website.
The methods for adding the next step depends on the type of website you have.
Written By
Firstly, make sure you have an author mentioned on your site. Something like “Written By…” and then your name. If you are using WordPress this is added automatically.
Name Match
The name in your byline should match the your Google+ name exactly. If you have a hyphen in your Google+ name then use it in your website byline. Make sure the names are identical!
Mark up
Open up your website html files in your favourite text editor and search for the <head> tag.
You want to place the code between the opening <head> and closing </head> tags. There will more than likely already be a few other meta tags there so just pop it in. Anywhere between the two head tags is good.
The line of code you want to add is:
[html] <link href=”https://plus.google.com/103629750031267776626/posts” rel=”author” />[/html]
Substituting your Google+ url and ID for ours. Please do make sure you enter your 21 digit ID and not ours or it won’t work!
Here’s an example of our rel=author code in place.

WordPress using the Genesis Framework
If you are using WordPress with the Genesis Framework then as with most things, this is going to be very easy to do!
Just add your Google+ url to your user profile in WordPress by clicking on Users > Your profile, scroll down to Contact Info > Google+ and past the full url into the text box and press save.
Simples. But that’s why we use Genesis and you should too.
To confirm this has worked you can view the source of an individual post or page and look for the rel=”author” tag and it should show as per the example code above.
Ok, so you’ve worked your way through all of these steps and we know you are itching to see if it works but please be patient. You will not see your avatar or image showing up in the Google search results for at least a couple of days. But don’t despair, there is a way you can test all your hard work and make sure that at least your Google Authorship set up and rel=”author” tag are correct.
Thankfully, Google have provided a handy tool to do the checking for you and it’s called the Structured Data Testing Tool.
Click on the link to the tool and enter your website url into the text field and click PREVIEW. You should see something similar to this:

Once this is all set up you will see your profile headshot, name and number of Google+ circles you appear in alongside all of your search results. Give Google at least a couple of days to show this in the search results as it’s not instant. But if you have followed our instructions and have tested everything with the Google Structured Data Testing Tool then you will show up.
Ok, so you have been through our post and it just isn’t working for you and you are scratching your head wondering where you went wrong.
Firstly what does the Google Tool say? Are there any clues as to what you’ve missed out? If not then let’s run through this checklist and make sure everything is ticked…
* Confirming your email address is just an alternate verification method, and only works for sites on which you have a domain email address.
If all your answers are yes then you are all set up and you just need to wait a few days for Google to pick up on the changes.
If you’ve found this article useful please consider giving us a Share, Tweet, +1 or Like. The more our content gets shared the more we can help people get Google Authorship set up on their website.
Genesis Framework.
We use and love the Genesis Framework by Studiopress and their varied and versatile themes play a big part in our business. But we don’t just grab a theme, paste content into it and invoice the customer. Each site uses bespoke styling using css and Genesis functions in the functions.php file.
Normally we just roll these in to the existing files but it’s always a worry that when the theme developer updates their theme. Our updates will be over-written.
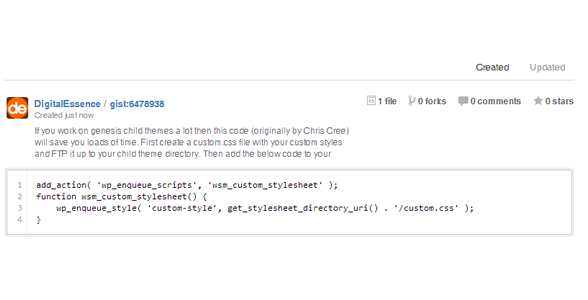
This is where this very handy tip by Chris Cree comes in use. Instead of adding your custom css edits or new classes to the existing stlye.css file, either mixed in with the original code or if you’re organised, at the bottom of the file. Use this PHP function to load an extra css file and place your code there.
You can grab the code from this post or on our Gist on GitHub
[php]
add_action( ‘wp_enqueue_scripts’, ‘wsm_custom_stylesheet’ );
function wsm_custom_stylesheet() {
wp_enqueue_style( ‘custom-style’, get_stylesheet_directory_uri() . ‘/custom.css’ );
}
[/php]
Some WordPress and website developers argue that adding additional server calls is detrimental to performance and you should try to minimise them by amalgamating code but personally we feel that with all the otehr overheads of Wordpess and plugins. Loading an extra css file will be negligible.

Innerleithen Holiday Lets is an established local business who, having just moved to the High Street, wanted to update their website to coincide with the move to their new premises.
Providing high quality holiday cottages, houses and apartments in the Innerleithen, Walkerburn & Peebles area. Innerleithen Holiday Lets came to Digital Essence looking for a modern, mobile responsive redesign of their current web site.
Working with them over the last couple of weeks. We discussed what they wanted and expected from their new web site and set about making the magic happen.
Their old site was hosted on a custom built backend and we worked closely with their developers to ensure the smooth, hassle free transition over to our system.
 One of the most important items on their wish list was the ability to edit the website themselves, we suggested the popular WordPress Content Management System (CMS) as it not only gives them total control over their site but also updates and improves stability and security.
On top of this we add our favourite Genesis Framework which gives us and our customers total security and fantastic Search Engine Optimisation (SEO) so they rank well in Search Engines like Google.
Working with a local Innerleithen based photographer to provide high quality interior shots of the holiday homes, we’ve produced what we think is a fantastic web site.
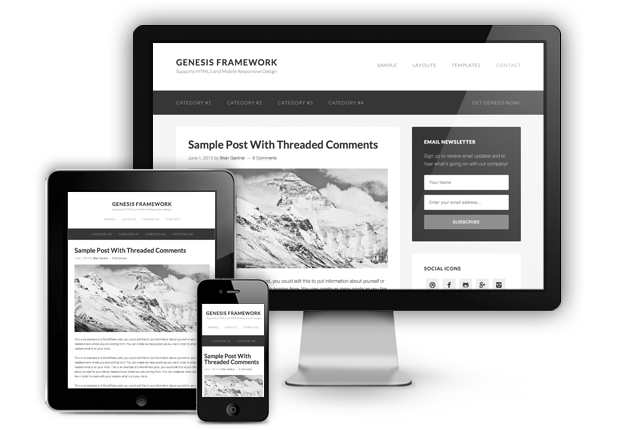
With nearly 20% of all web traffic coming from mobile devices like Smartphones or Tablets, web sites have to work well on all devices from a Desktop computer to a Mobile Phone otherwise you risk losing business.
All of the websites we design are 100% Mobile Responsive. This means that whether you are sat at your desk, browsing on your iPad or on the move using your Mobile Phone. Our customers web sites will look just as good.
And needless to say, the Innerleithen Holiday Lets website works superbly whatever device you are using.
If there’s one Golden tip/nugget of information we want to pass on to our customers. It’s that Content is King. It doesn’t matter how fancy your website is, it is good quality, relevant content that will show in the Search Engine Results Pages (SERPS). One of the best ways to produce this is to Blog. Blogging allows a web site owner to write about events that are relvant to their locality or business.
Without original and desirable content, any media venture is likely to fail through lack of appealing content, regardless of other design factors.
One of the reasons why we use WordPress to power all of our websites is that, it’s an amazingly powerful blogging and news platform. WordPress allows our customers to quickly and most importantly, easily update their site. They can write news items that are relevant to them and post them to their website (eg: this is a Blog post). This means that they can keep their websites updated with local news and help drive traffic to their site.
Please have a look at the new Innerleithen Holiday Lets website at www.innerleithenholidaylets.co.uk and if you are interested in a new website or redesign of your existing site, please give us a call on 01896 888 235 and we will be more than happy to discuss your requirements.

We are really excited by the release of the brand new version of Genesis 2.0 Framework for WordPress.
Genesis 2.0 is a huge leap forward for the framework. It includes essential web standards like HTML5 and schema.org to make your WordPress website as fast, secure, flexible, and findable as it can be.
All new Genesis themes will be fully Mobile Responsive so your site looks as good on a Mobile Phone or Tablet as it does on a PC.
Brand New Design
Genesis is sporting a fresh new look.
We’ve taken advantage of the new HTML5 markup, as well as some snazzy CSS3, and we think you’re gonna love this.
HTML5 Markup
Genesis has always been on the cutting edge of web technology, and Genesis 2.0 continues in that excellent tradition.
With a single line of code in a child theme, Genesis will now output HTML5 markup in place of the old XHTML tags. Also, every theme we build in the future will be developed on HTML5.
Microdata
If you’re using a theme with HTML5 enabled, Genesis will also output your markup using microdata.
We did all the research and modified the markup to serve search engines the microdata they’re looking for, so you don’t have to. It’s good to be a Genesis user.
Removing Features
We want to keep Genesis as lightweight as possible for you, nobody wants to use bloated software.
So we’ve removed the “Latest Tweets” widget, the “eNews and Updates” widget, the “post templates” feature, and the “fancy dropdowns” setting. There are some good plugins you can grab and install, if you want to continue using those functionalities.
Boring, but Very Important
We’re always improving. Call it a sickness, but we like to make things work really, really well. Here’s a list of the technical changes in this latest release of Genesis: